How to Draw Chair Conformations
Drawing chair conformations in organic chemistry doesn’t have to be challenging. Stick with me for a few minutes, and I’ll show you how it’s done.
Before we start, grab some quad-ruled paper like what you see on my screen in the video above; it’ll be handy.
Ready? Great! Let’s begin. First, let’s discuss how to correctly sketch a chair conformation. If you draw something resembling scribbles or a bowtie, you’ll likely score zero on your exam. Those aren’t chairs.

Step 1: Sketching the Basic Structure
- Start by finding a cross on your grid paper and place a dot at the intersection.
- From that dot, draw a diagonal line extending three squares across and one square down.
- Continue another diagonal line from the end of the first line, going three squares across and one square up.
- Return to your original dot and draw a slightly diagonal line downwards, placing another dot there.
- Draw two more diagonal lines from this new dot, each three squares across and one square either up or down, depending on the direction.
- Finally, connect the ends of your lines to complete your chair structure.
You can reverse the directions to draw a chair facing the opposite way.
Note: Learning to draw chairs on plain paper is crucial for exams, as grid paper is often not provided.
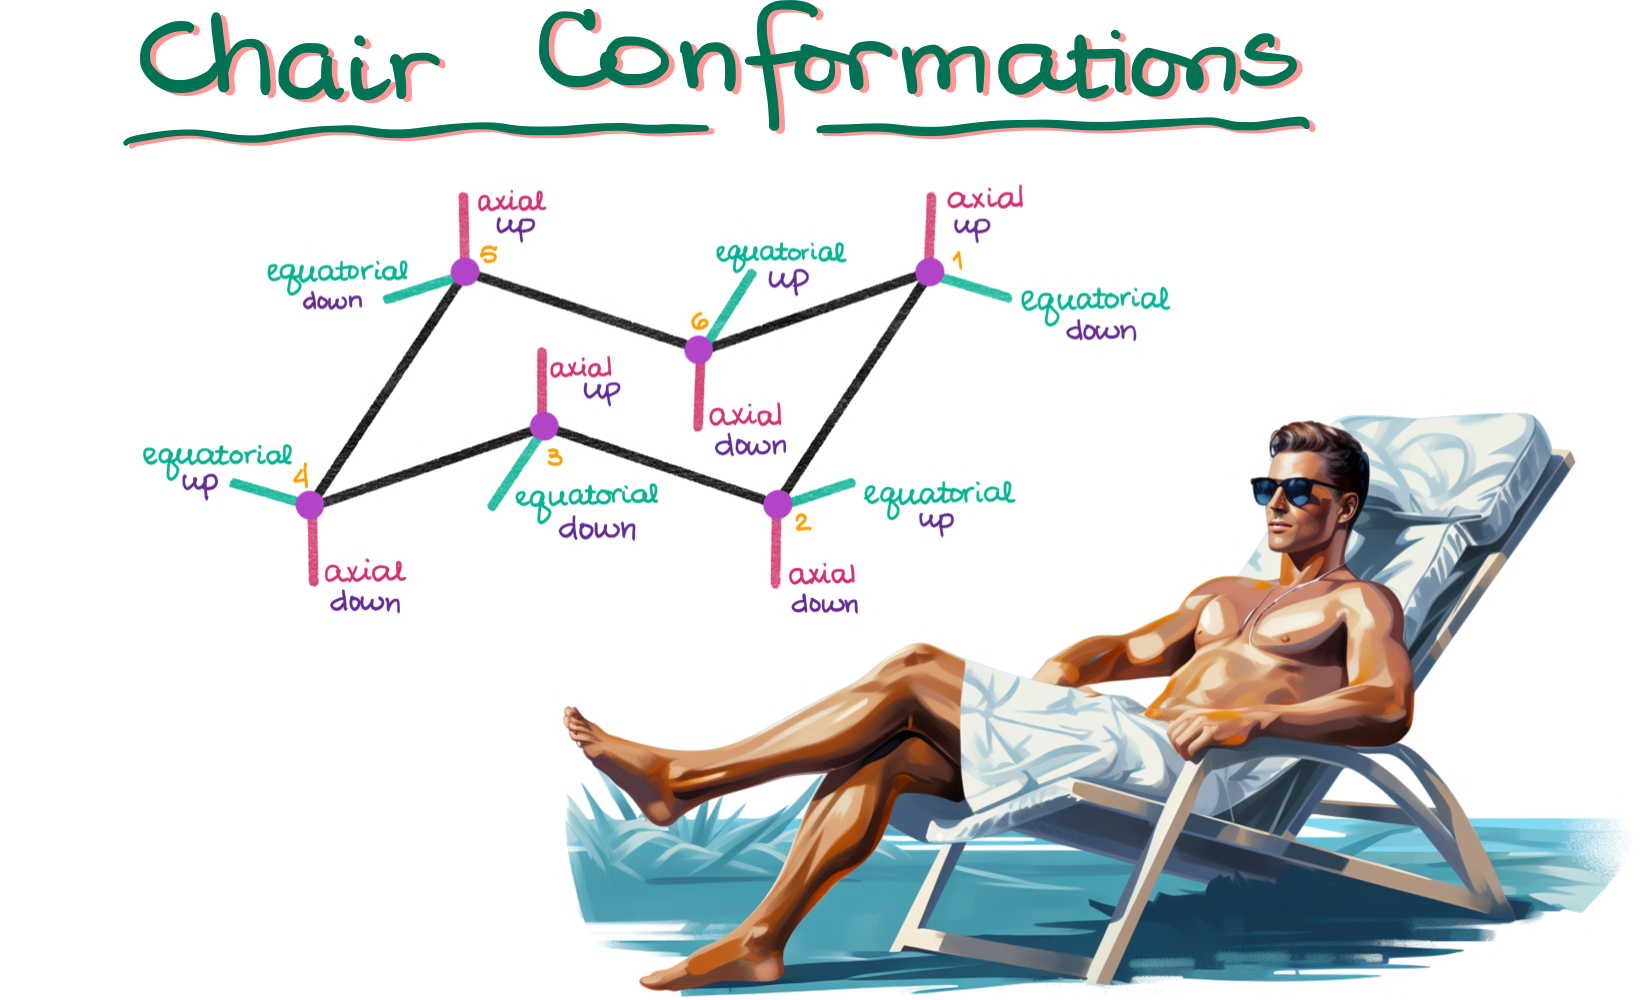
Step 2: Adding Substituents
Once you’ve drawn the basic chair structure, it’s time to add the substituents.
- Axial Positions: These will point directly up and down from the corners of your chair.
- Equatorial Positions: These are trickier. Each equatorial position will be parallel to some line in your chair structure (see color-coded figure above).
Remember, when drawing equatorial positions, they should always angle away from the central points of the chair.
Mastering the skill of drawing chair conformations is essential for excelling in organic chemistry. Precision is key, especially when adding substituents to the carbons on your chair structure. Always make sure your bonds are at the correct angles.
If you’re sloppy with your angles or your bonds point in unclear directions, you run the risk of losing points. Instructors need to easily understand your drawings, particularly when chair conformations are crucial for molecular analysis.
So, practice diligently. Accurate and clear chair conformations won’t only help you score well on exams but also enhance your understanding of molecular structures.
Chair Flip
Next, let’s delve into the concept of the “chair flip,” which is somewhat of a misnomer. Contrary to what the term implies, you’re not actually flipping the chair structure. Instead, you’re making slight adjustments to the atom positions within the molecule.
In a chair flip, the atoms move either up or down but remain in their general vicinity. The front bond stays closer to you, while the back bond remains further away.
To better visualize this, consider the animation in the video above. It shows how the atoms move slightly but remain relatively in the same area, depending on the direction in which we’re “flipping” the molecule. While this isn’t a scientifically accurate depiction of a chair flip, it’s sufficient for educational purposes to underscore that a chair flip doesn’t involve physically flipping your chair structure in any way.
How to Perform a Chair Flip
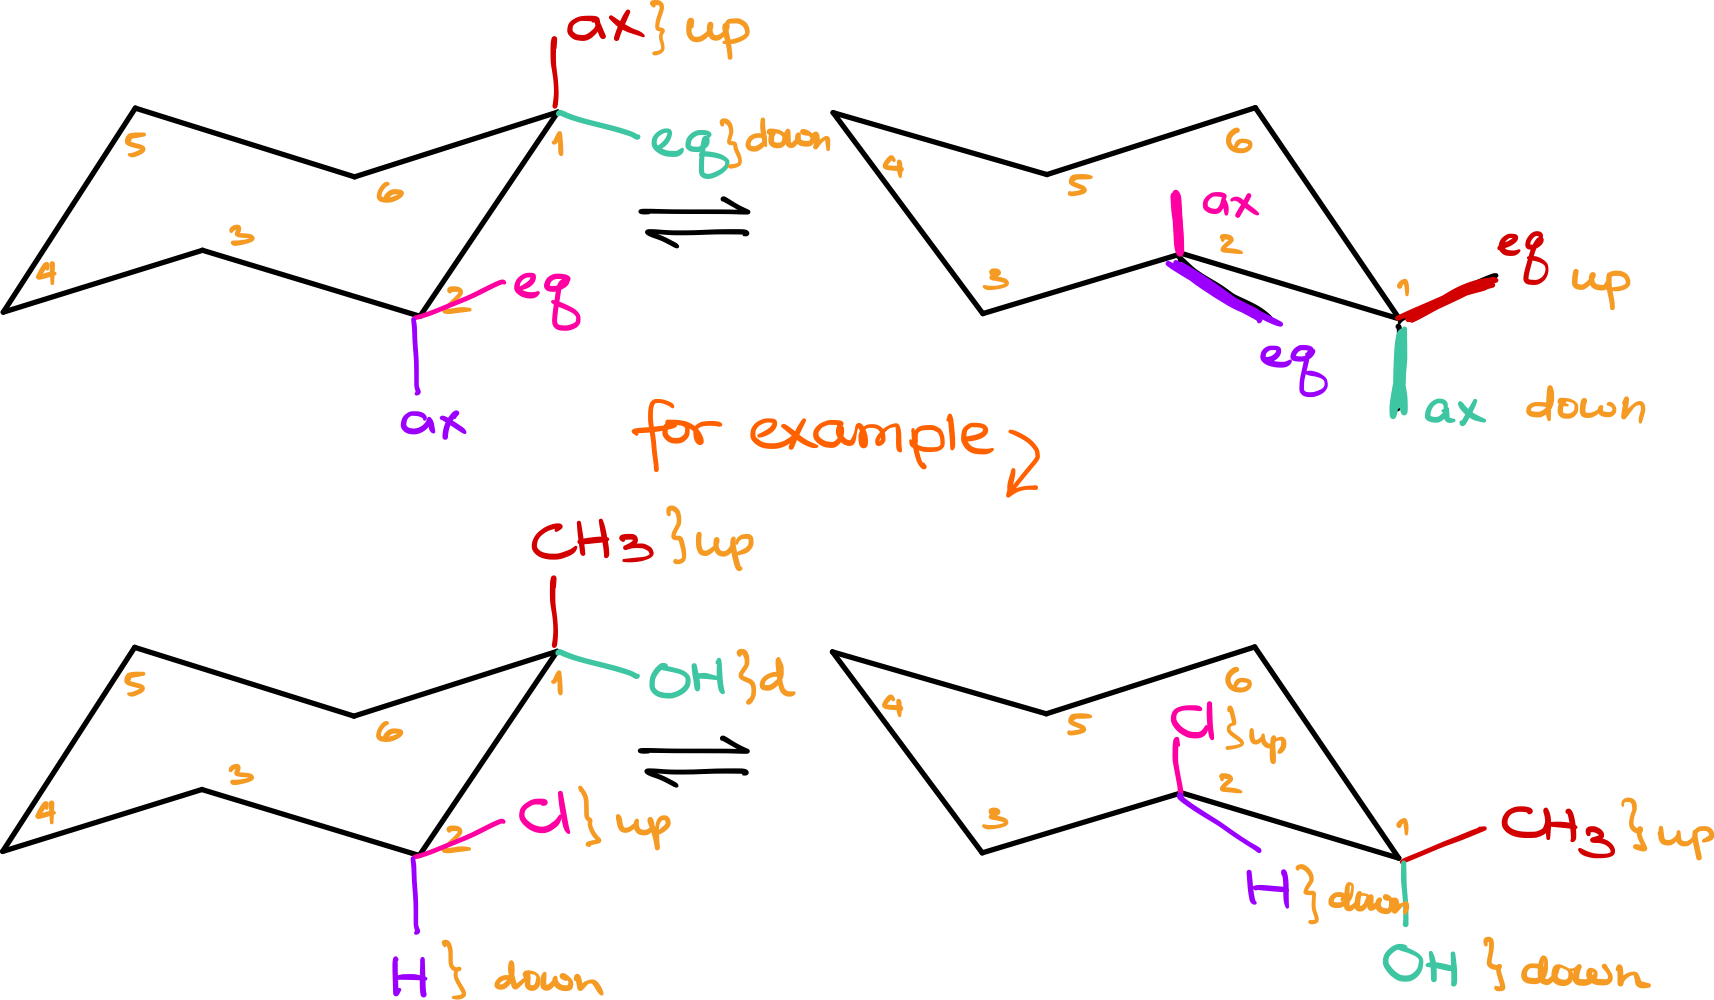
To better understand, let’s work through an example. Start by drawing two chair conformations and number each carbon. For demonstration purposes, I’ll start numbering at the top right corner and go clockwise, but you can choose any method. These numbers serve as anchor points, helping you identify each carbon.
Let’s assume carbon number 1 has an axial group and an equatorial group, while carbon number 2 has the same. When performing a chair flip, these groups remain on carbons 1 and 2 but change their axial or equatorial positions. For instance, if the axial group on carbon 1 was “up,” it will remain “up” but now become equatorial. Conversely, what was equatorial and “down” will now be axial and still “down.”
The key takeaway is that the general orientation—up or down—remains constant, while the axial and equatorial positions switch. This change affects the overall orientation and contributes to the concept we refer to as a “chair flip.”
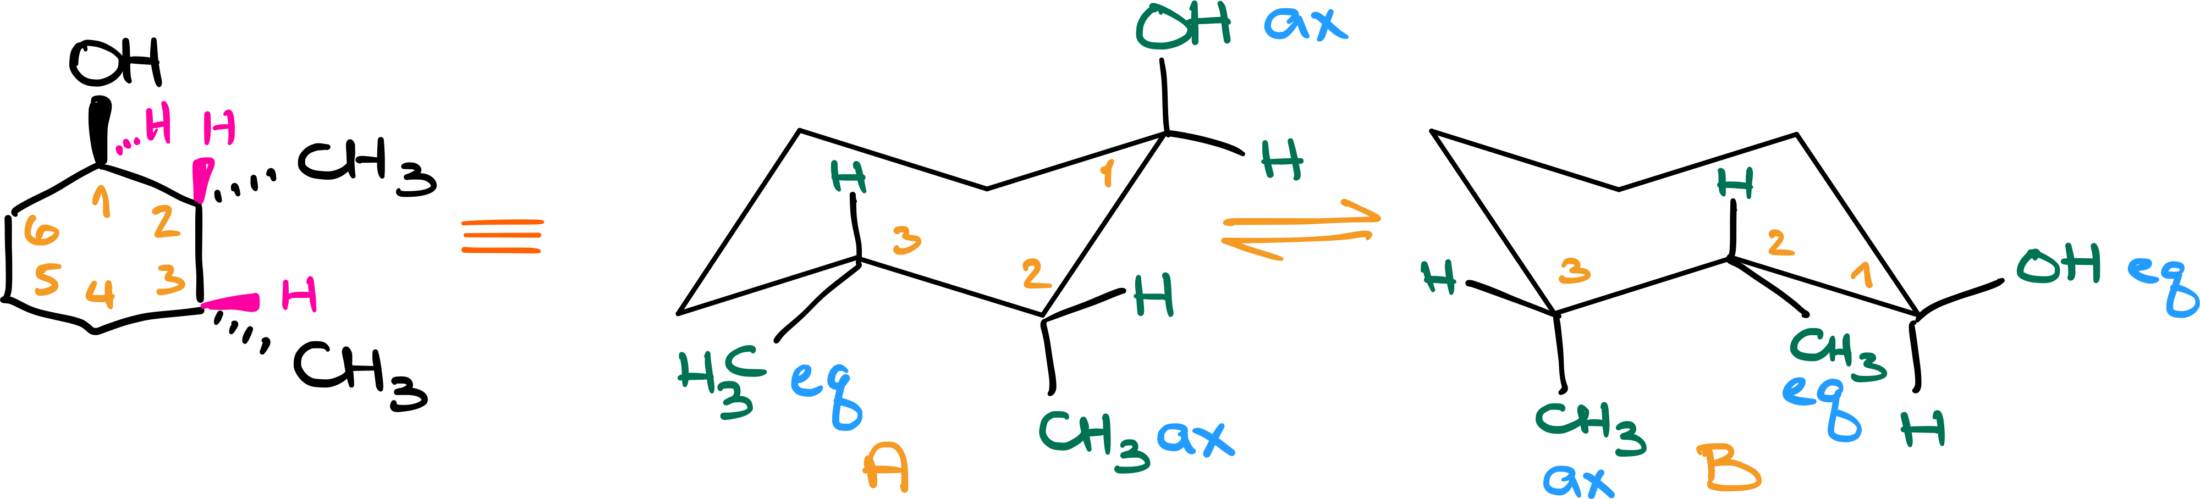
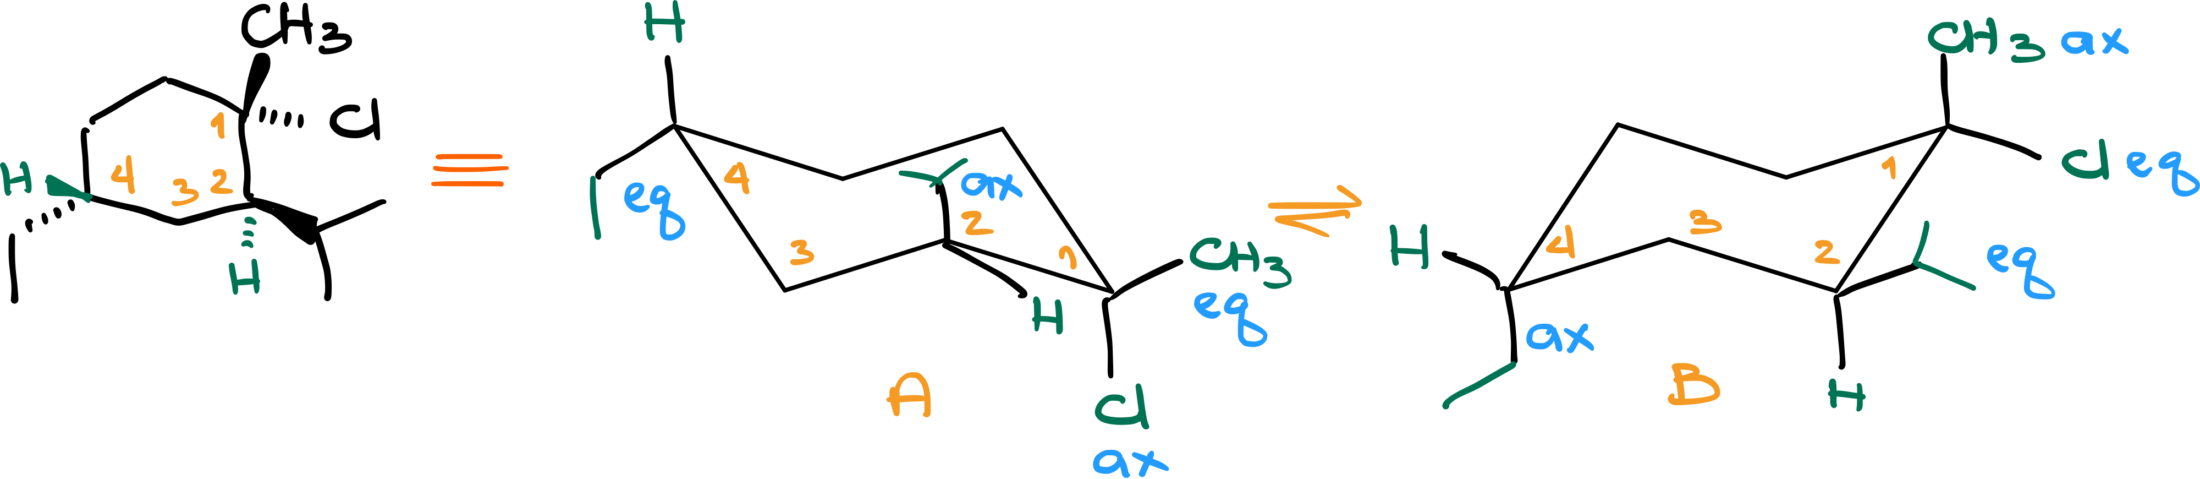
Examples of Chair Conformations and Chair Flips
Now the reason why I’m paying so much attention to what is up and what is down is because up corresponds to the wedged position in a six-member ring when we have a dash and wedge representation and down corresponds to a dashed position. Let me illustrate that with an example.

Hi Victor! I have a question on what decides whether the chair conformation left-hand side is pointing upwards (head rest) or downwards (foot rest), or does it matter which chair conformation you draw first?
Doesn’t matter. You can draw whichever you like first. The important point is always to compare both conformation regardless which one you started with first.
your website is really really helpful, thanks so much
Hi! I have a question on numbering those number. Is there any pattern in the position we count the numbers or it doesn’t matter?
It really doesn’t matter for as long as you stay consistent (clockwise or counterclockwise). Personally, I like to number clockwise starting from top right. But that’s me and how I’m used to it.