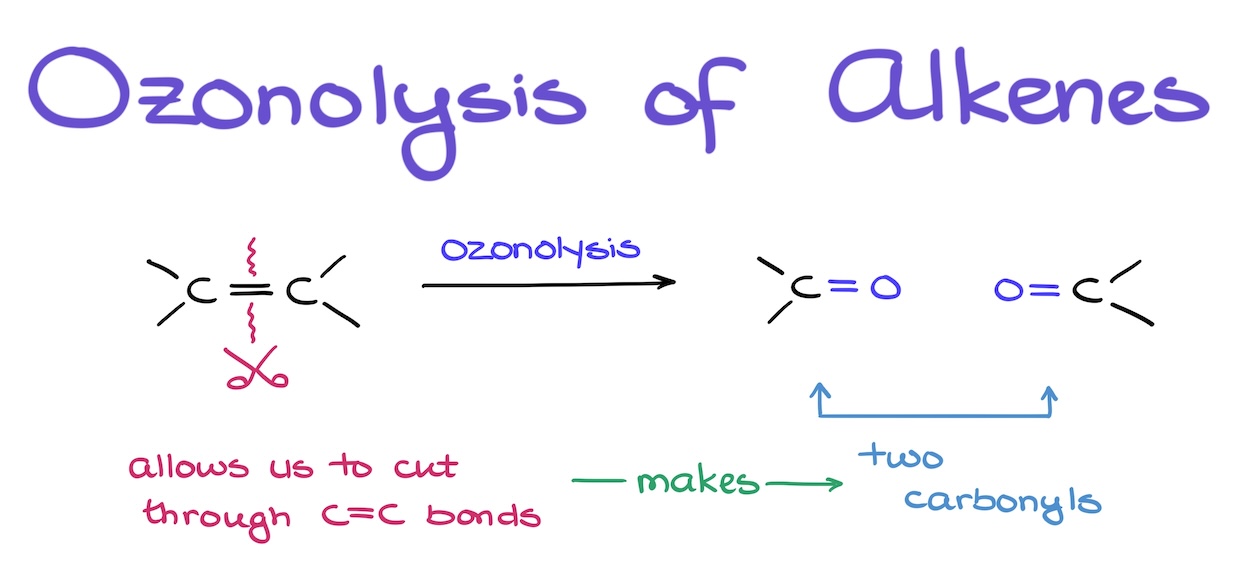
Ozonolysis of Alkenes
Ozonolysis of alkenes is the major synthetic approach we’re going to use when we need to cut through the carbon-carbon bonds. And while this reaction has a rather complex mechanism, there’s a simple trick I’m going to show you that will allow you to draw the ozonolysis products easily from the first attempt every single time.
Ozonolysis Mechanism
Before we jump into any tricks, let’s take a proper look at the mechanism of the ozonolysis.
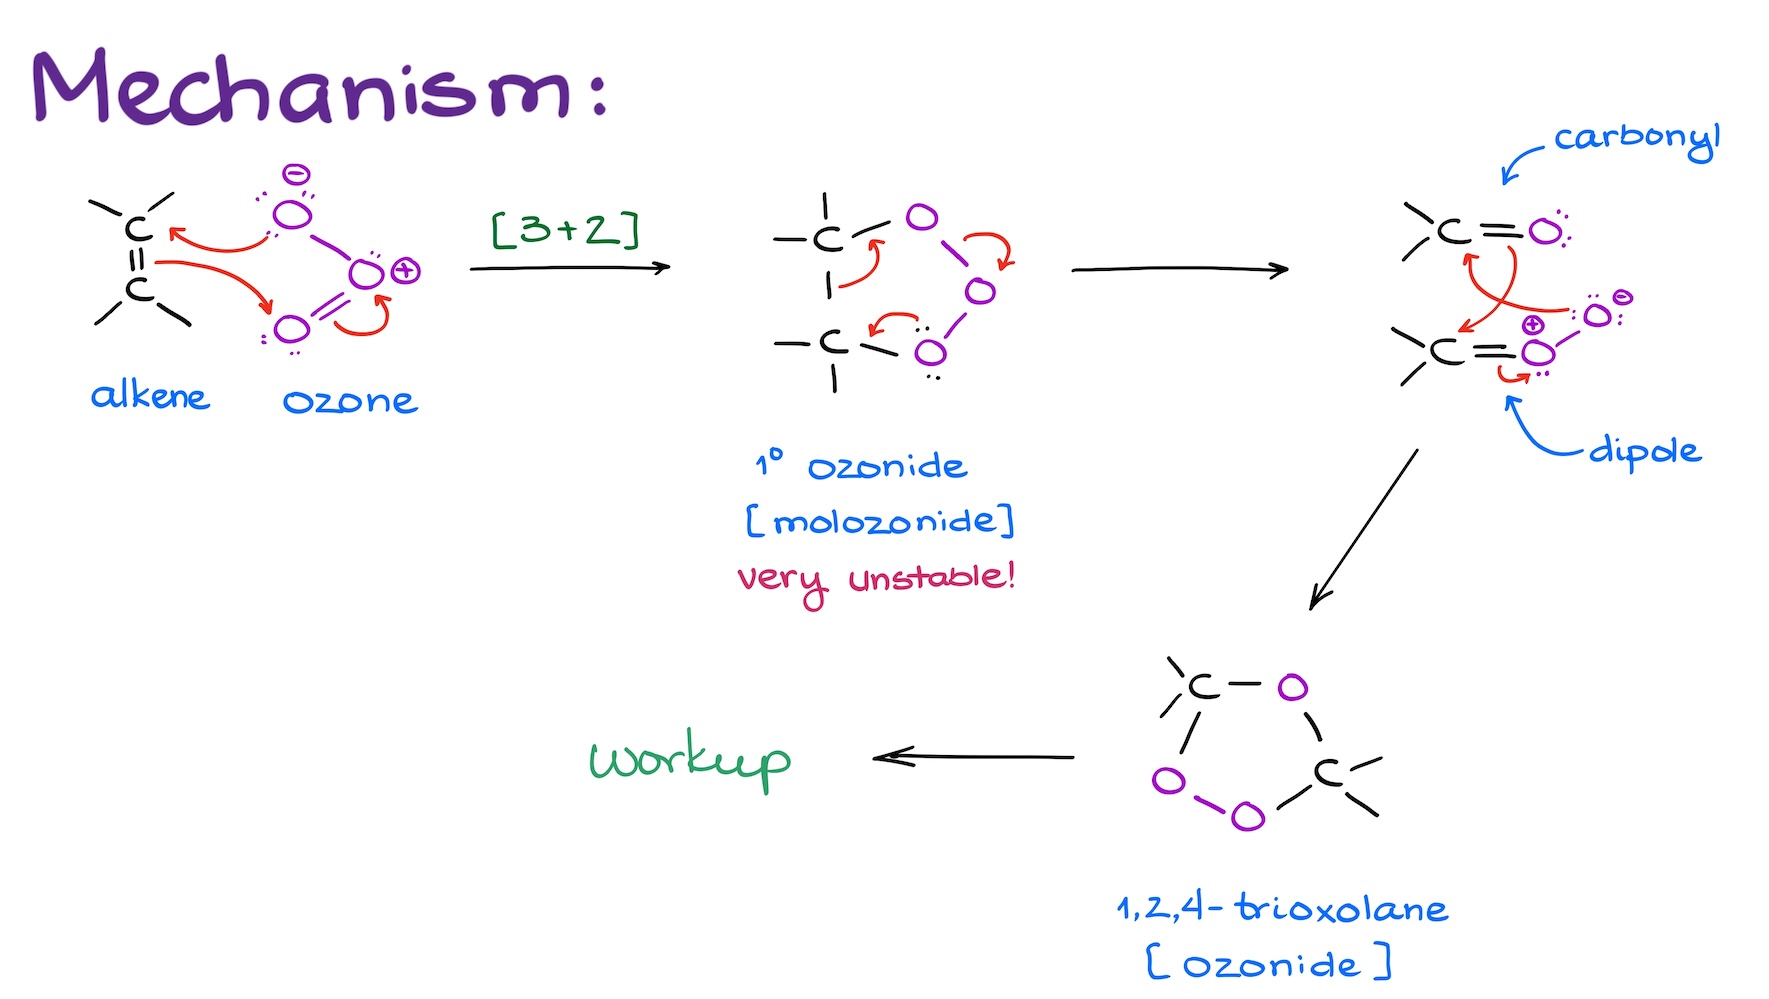
The first step is technically classified as a [3+2]-cycloaddition reaction. In this step, ozone adds to the alkene forming a five-membered ring that we refer to as a primary ozonide or “molozonide” which stands for “molecular ozonide.” This species is quite unstable and will most likely explode if you attempt to isolate it. Luckily, we don’t have to isolate it.
Molozonide decomposes itself in situ, generating a couple of interesting looking species. One is a simple carbonyl. The other one is a rather reactive dipole. This dipole will quickly react with the carbonyl compound reforming a five-membered ring. This molecule is technically called 1,2,4-trioxolane, but we commonly refer to it as the ozonide. And while it is a significantly more stable species than molozonide, we still don’t isolate it and proceed to a workup step right the way.
Oxidative vs Reductive Workup
Now, when it comes to the workup, that’s where things get interesting. There are two types of workup steps we’re going to see in the ozonolysis reaction.
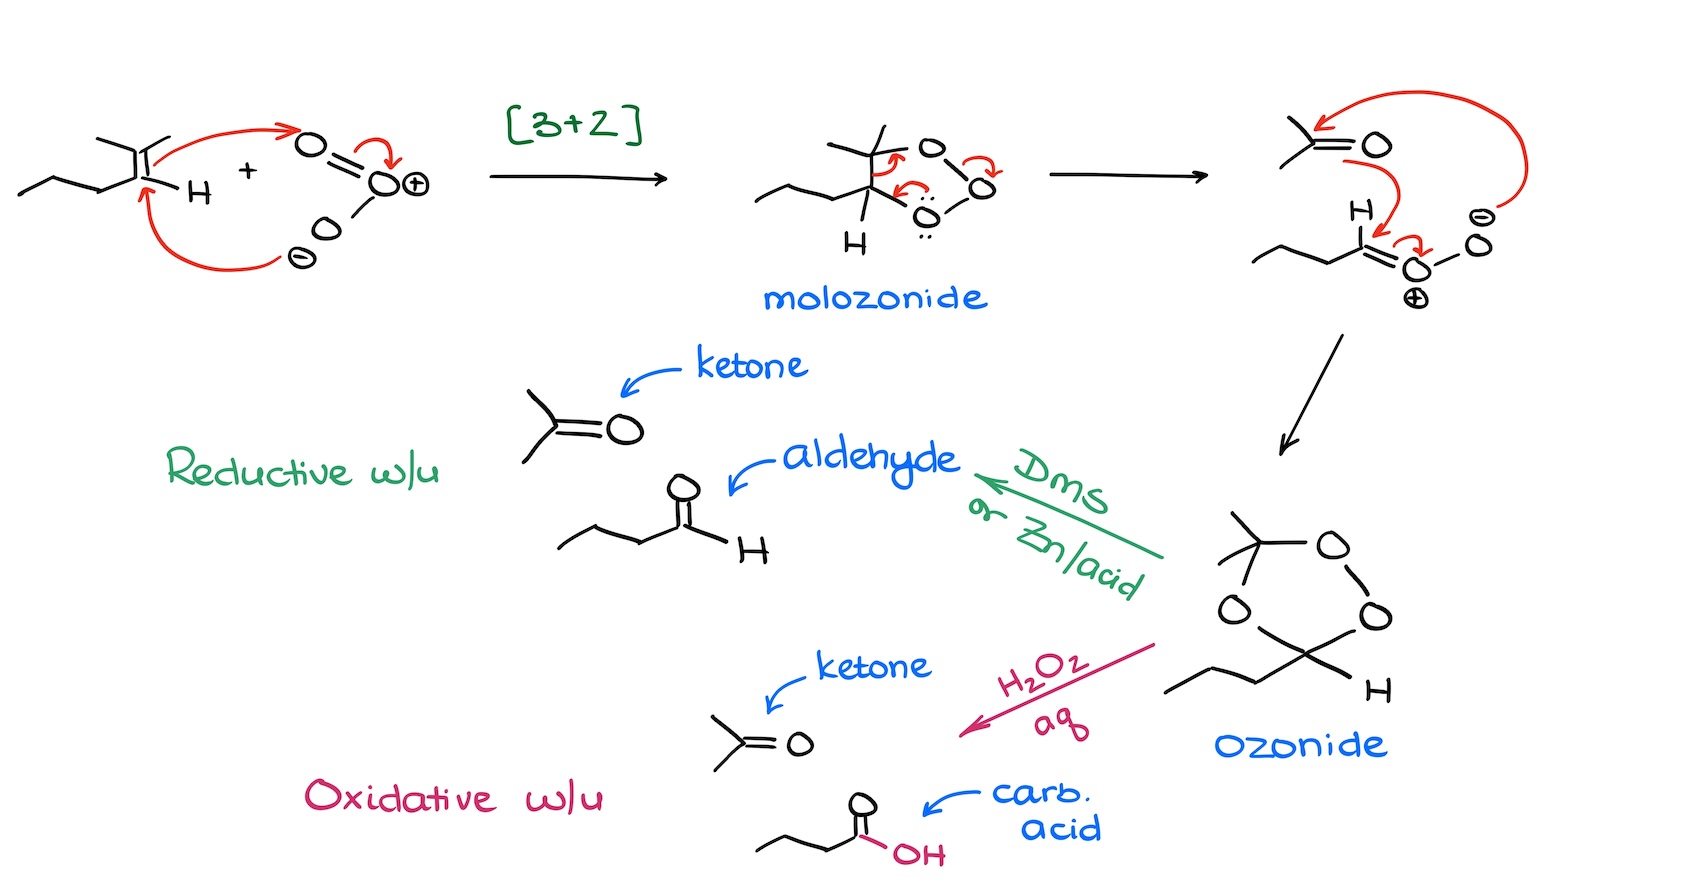
First, the reductive workup, makes aldehydes and ketones. We typically see dimethylsulfide or zinc in acid used for the reductive workup. The important feature of the reductive workup is that we preserve the hydrogen of the aldehyde. Which of the two reagents you should use in your class? Well, for our purposes they are interchangeable. The first one—dimethylsulfide—is very effective and equally as stinky. That reagent reeks! The second one—zinc in acid—is clean and simple but very moody and picky about the zinc quality and freshness. So, if you were to do it in the lab, you’d go with whatever limitation you personally are willing to deal with. Personally, I don’t mind the smell of sulfur-organic, so I don’t mind using DMS a bit.
Second, the oxidative workup, makes carboxylic acids and ketones. We use aqueous hydrogen peroxide for the oxidative workup.
Luckily, we don’t usually cover the mechanism of either workup steps in the sophomore organic chemistry course. So, typically, you’ll be only responsible for the formation of the ozonide intermediate. But in my experience, some instructors skip even that part. In any case, if you need to know this mechanism, make sure you practice the curved arrows here a few times so you don’t make a silly mistake on the test.
Trick
Now, I promised you a simple trick to derive the products, right? Well, here we go.
Let’s take the same starting material I’ve used for my mechanism. In oder to easily draw the product, I’m going to follow these steps:
- I’m first going to look at the nature of my workup step and check if I have any hydrogens on my alkene. This is relevant, because reductive ozonolysis preserves those, while the oxidative ozonolysis converts those into -OH groups. Here, we have a reductive ozonolysis, so I’ll end up keeping this hydrogen.
- Next, I’m going to redraw my starting material but I’ll do it with a ridiculously long double bond.
- Once I have that, I’ll erase the middle portion of my double bond…
- …and stick an oxygen at the end of each of those newly formed double bonds.
And voila! We’ve got our ozonolysis products!
If it was an oxidative ozonolysis, I would go through the same steps, but I’ll remember to convert my hydrogen of the aldehyde into an -OH group to make a carboxylic acid.
So, I’ll take my molecule, redraw it, erase the middle of the double bond, add oxygens, and add an -OH group.
Avoid These Common Mistakes
There are a couple of common mistakes that I see students make all the time when dealing with the ozonolysis.
Cyclic Alkenes
The first common mistake is mistreating the cyclic alkenes. Let me illustrate this with an example.
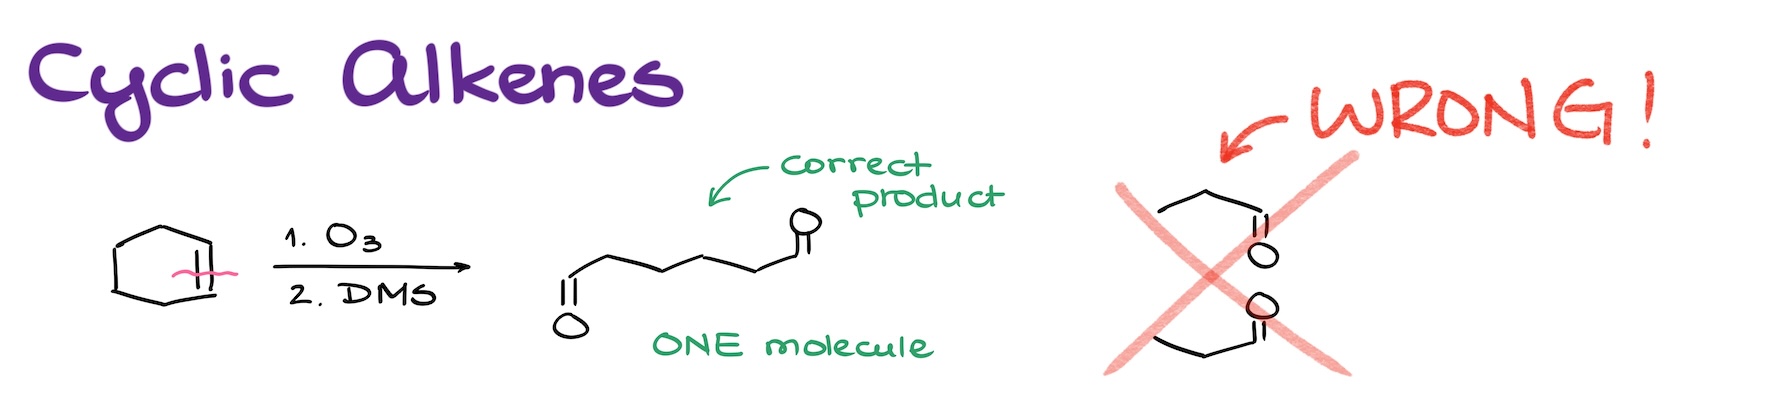
Let’s say we have a cyclohexene molecule and we’re doing a reductive ozonolysis of this species. Ozonolysis cuts through double bonds. And while we often see this cutting our molecule in two, it’s not always going to be the case. Here, the double bond is a part of a cycle. So, while I’m indeed going to be cutting through my double bond, the rest of the molecule is going to stay intact! Think about it like cutting a hair tie for example. If you just make a single cut, your hair tie is not going to break into two pieces, it’s going to end up as one elastic piece of rope instead. So, same deal here.
If it helps, draw a line through your alkene, and then take a highlighter and highlight the chains from one carbon of the double bond to the next one to see how many pieces you’re going to get. The rule here is that you cannot cross your red line that you drew through your alkene!

So, for instance in the next example, I have two double bonds, but I’m still going to end up with only one product. I’m cutting through the double bonds, but I’m keeping the rest of my molecule connected.
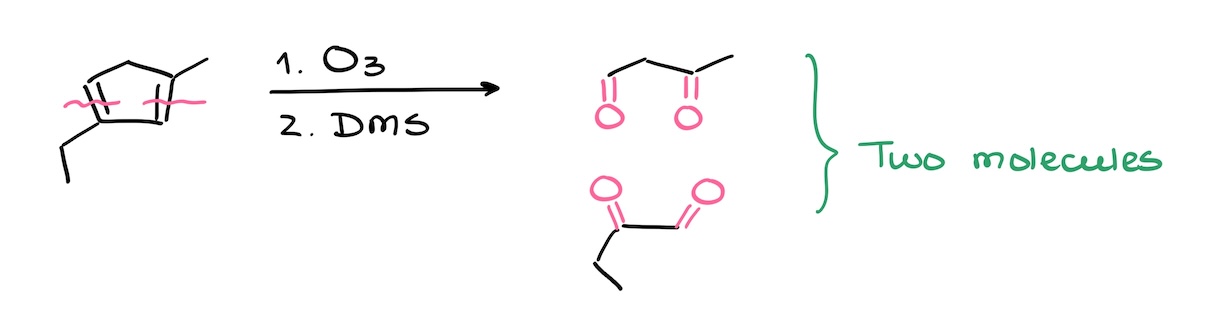
In the next example, however, I did end up making two products. So, always pay close attention to your molecule rather than mindlessly break it into pieces.
Pay Attention to Atoms
And another common mistake I see is when students erroneously add extra atoms or groups to the molecule.
Lemme give you an example here. Let’s say I have the following reaction in front of me.
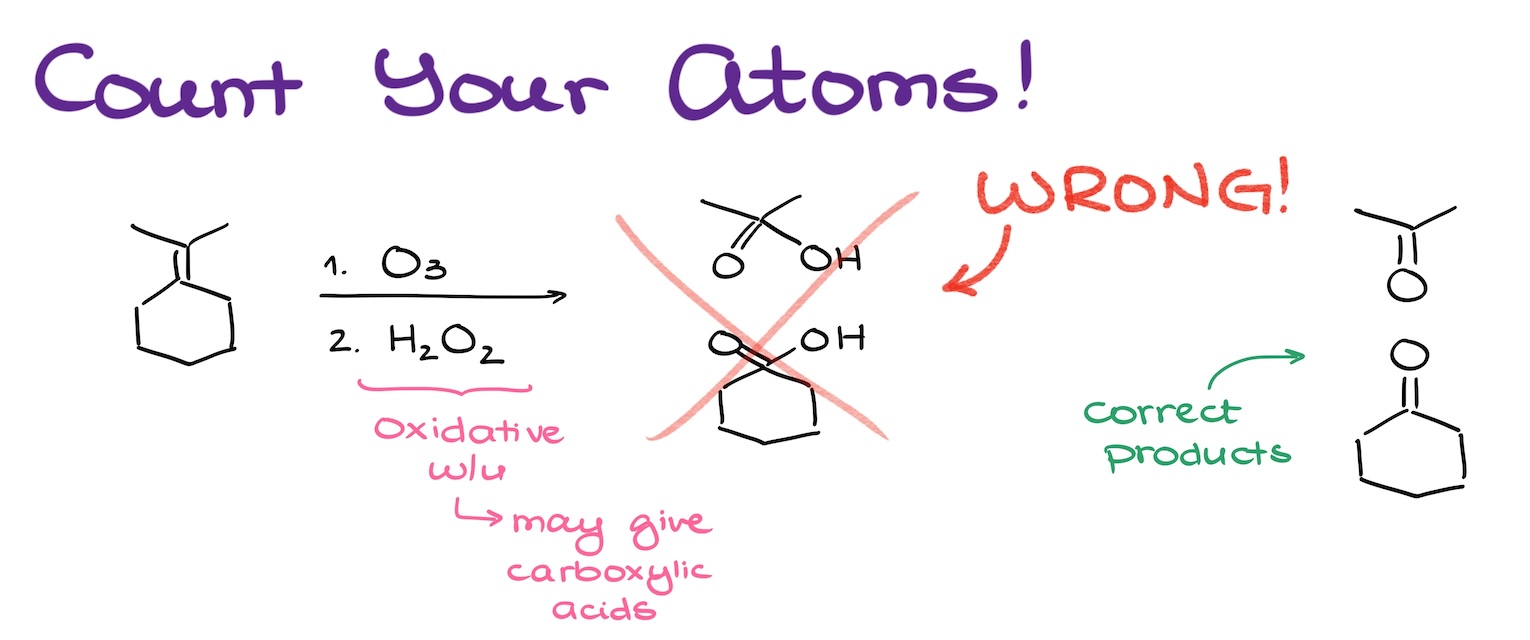
Many students would see that this reaction is an oxidative ozonolysis, they remember that this reactions tends to give carboxylic acids, so they mindlessly jam that -OH group onto the product. You might be thinking it looks ridiculous, and you’re right! But I kid you not, I saw this happening tens of not hundreds of times in my career. You see, when you’re taking a test, you’re a little nervous, maybe a tad anxious. And it’s easy to make mistakes like this one. So I wanna point it out now, so you’ll be less likely to make this mistake in the future.
Similarly, when you are dealing with a fairly large molecule, it might be a good idea to number your atoms to make sure you don’t miss any or add extra ones. For instance, let’s look at this example.
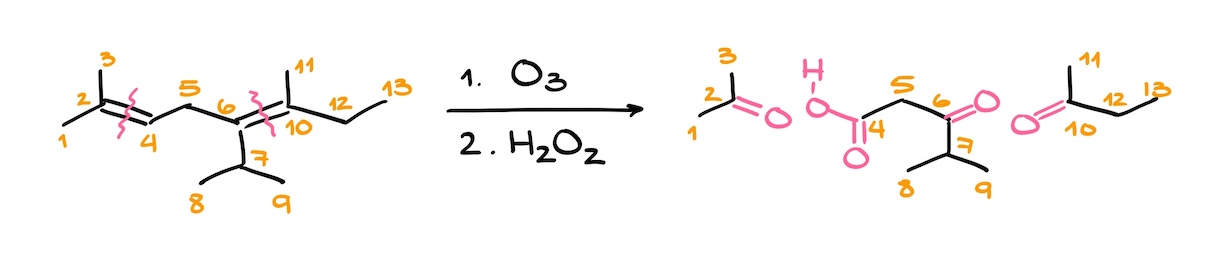
Here we have two double bond, so we’ll be cutting this molecule in two places making three products. With so many moving parts, it’s easy to miss some of your carbons. So, I would number my atoms right the way. This way I’ll know how many carbons I have and how many carbons to expect among my products.