How to Convert Newman Projections to Dash and Wedge Representations

In this tutorial I want to show you how to convert Newman projections into clean line-angle dash-and-wedge drawings. Like in the earlier Newman projection tutorial, I will give you a simple step-by-step strategy that works every time without forcing you to mentally twist molecules in 3D. This approach is mechanical, reliable, and great for exam settings where you want a method that cannot fail you.
General Strategy
Before working through the examples, let’s outline the general strategy.
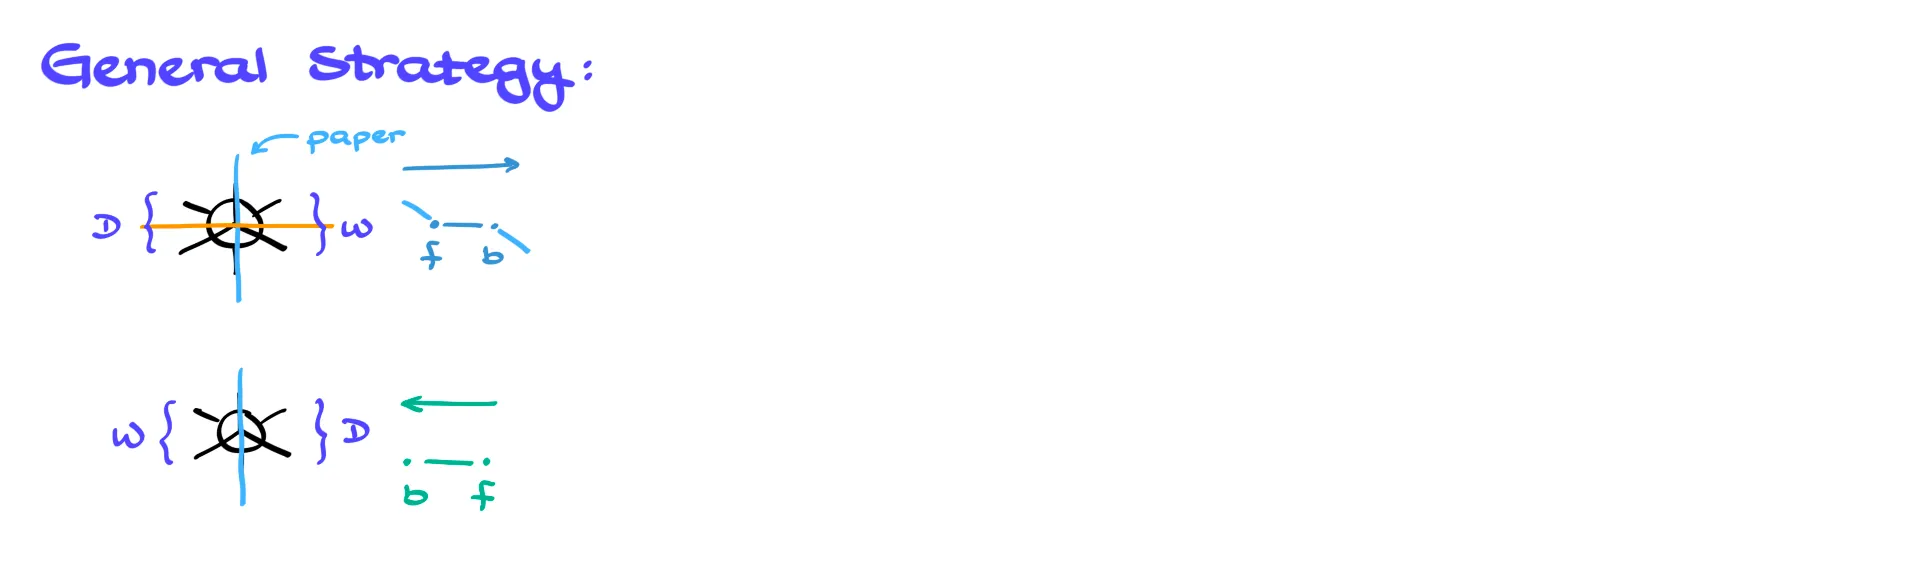
Any Newman projection has a front atom, shown as a dot, and a back atom, shown as a circle. We can draw the dash-and-wedge structure in either direction. We can go left to right, meaning the front atom sits on the left and the back atom sits on the right, or we can go right to left, placing the front atom on the right and the back atom on the left. Both approaches give the same molecule because they differ only by a rotation in space.
To keep everything organized, I use two guides: the plane of the paper, represented by the vertical line, and the horizon, represented by the horizontal line. Anything that sits on the plane of the paper is drawn with plain lines. When we go left to right, the groups on the right side of the Newman projection become wedges, and the groups on the left side become dashes. If we reverse the direction and go right to left, the assignments switch: the right side becomes dashes and the left side becomes wedges. The position of each group relative to the horizon tells us whether it should appear above or below the bond connecting the two atoms.
Example 1
Now let’s look at the first example.

I draw the plane of paper and the horizon, then commit to drawing left to right. The front atom appears on the left, and the back atom appears on the right. On the front atom the CH3 group is above the horizon in the plane of paper, so I draw it straight up with a plain line. The chlorine is to the right and below the horizon, so from this perspective it must sit on a wedge pointing down. The hydrogen is below the horizon on the left, so I draw it down on a dash.
On the back atom the propyl chain appears below the horizon in the plane of paper, so I draw that chain downward as a plain line. The hydrogen on the right is above the horizon, so that one goes up on a wedge. The OH group is on the left and above the horizon, so I show it up on the dash. Remember that the exact tilt of your dashes and wedges does not matter for as long as they point generally toward or away from you in a consistent way. If you prefer, you can slightly tilt them up or down; the stereochemical meaning stays the same.
We can also draw this same molecule from right to left. Now the front atom goes on the right and the back atom on the left. The groups still sit above or below the horizon according to the original Newman projection, but the assignment of wedges and dashes flips. For example, the hydrogen that was on the left becomes a wedge when we reverse the perspective, and the chlorine becomes a dash. When you compare the two finished drawings, the structures match; one is only a rotated version of the other. For the rest of this tutorial I stick to drawing left to right because it keeps everything uniform.
Example 2
In the next example I again draw the front atom on the left and the back atom on the right.
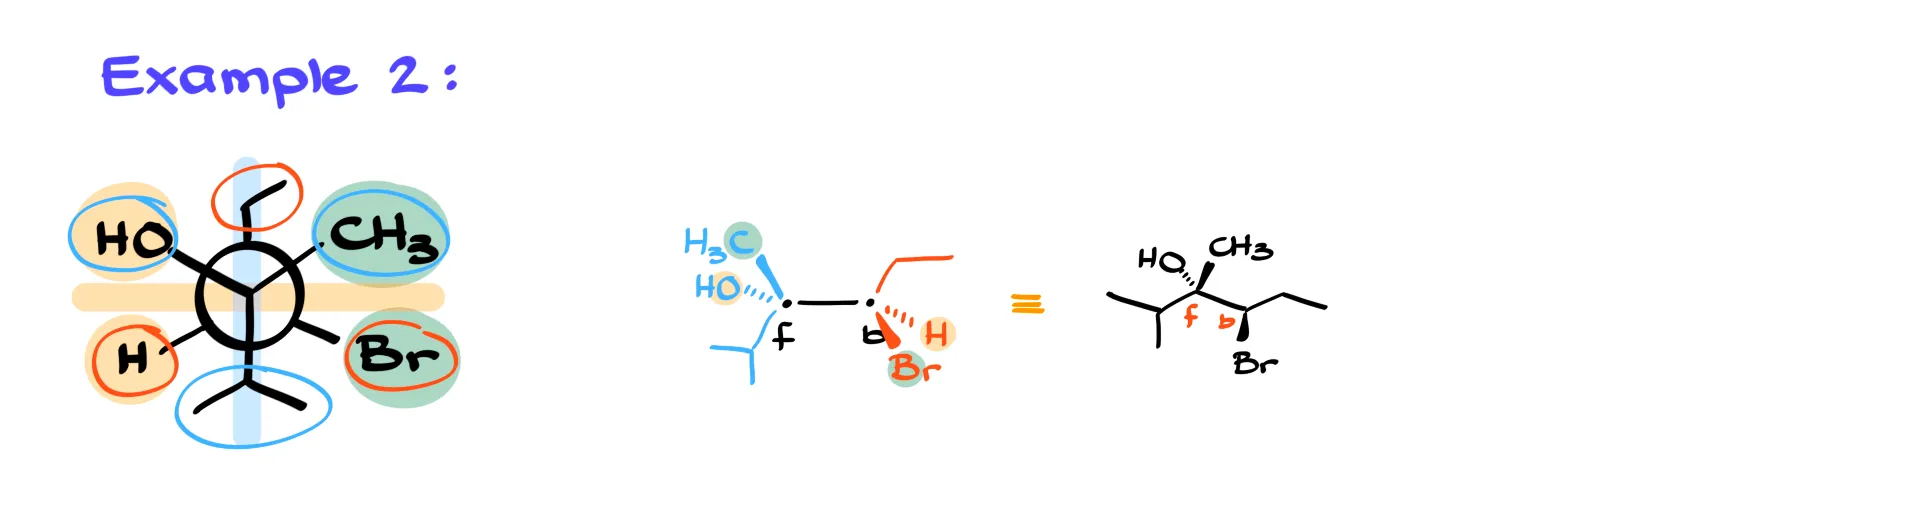
The front isopropyl group sits below the horizon in the plane of paper, so I draw it down with a plain bond. The CH3 group is above the horizon on the right, which puts it on a wedge. The OH group is above the horizon on the left, so it goes on a dash. On the back atom the ethyl group looks up in the plane of paper, so I draw it up as a plain bond. The bromine sits below the horizon on the right, so that one goes on the wedge. The hydrogen is below the horizon on the left, so that goes on the dash.
Once you finish a structure like this, you can quickly check your consistency by comparing groups that appear on the same side of the molecule in the Newman projection. For example, in this case the CH3 group in the front and Br in the back appear on the same side in the Newman view, and in the dash-and-wedge structure they both appear on wedges. Likewise, the OH and the front hydrogen both sit on dashes. This simple check will immediately show you if you flipped something by mistake.
If I wanted to redraw the structure in a cleaner, more traditional zigzag style, I could tilt the whole structure slightly and adjust the dashes and wedges without changing any stereochemistry. Once the initial conversion is correct, tidying the drawing becomes much easier.
Example 3
The next example uses an eclipsed conformation, but the method does not change.
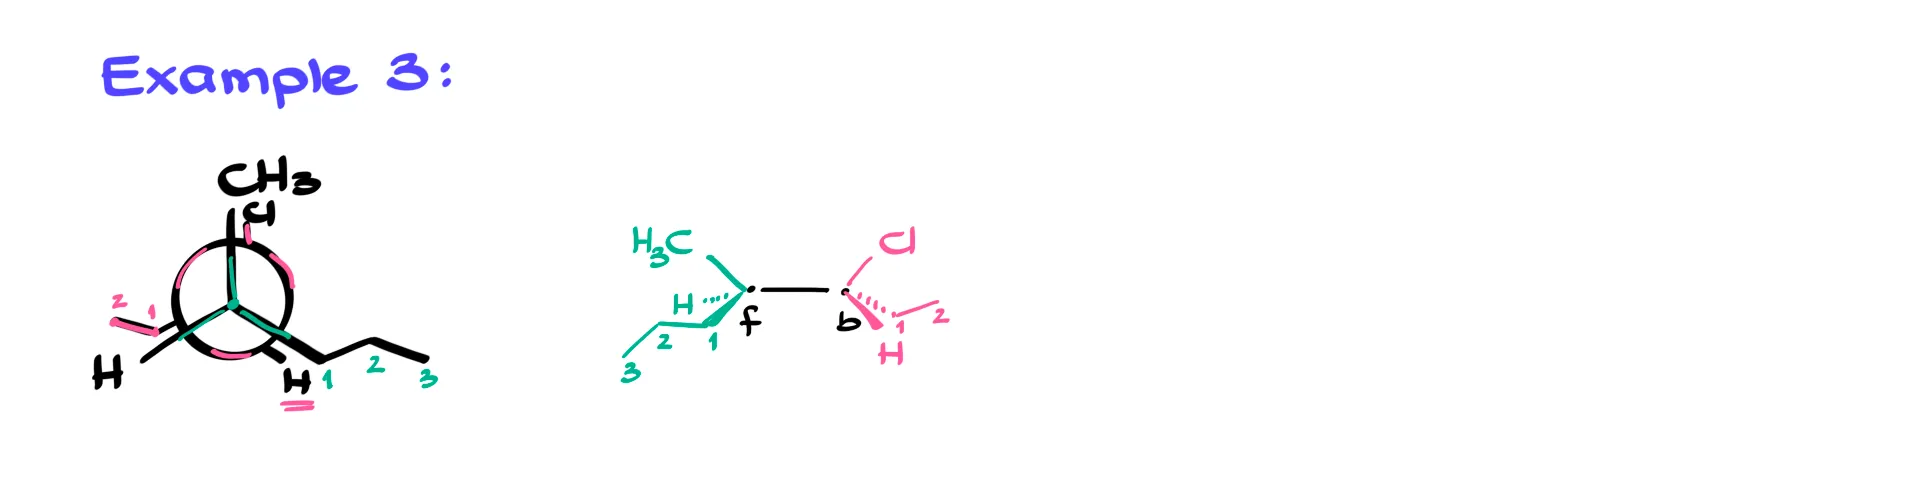
I mark the front atom and the back atom, then place each group according to its vertical position and whether it belongs on the left or right. Eclipsed structures often look more crowded, but the algorithm still works. As long as you determine the side and whether each group is above or below the horizon, the dash-and-wedge picture falls into place.
Example 4
The following eclipsed example works the same way.
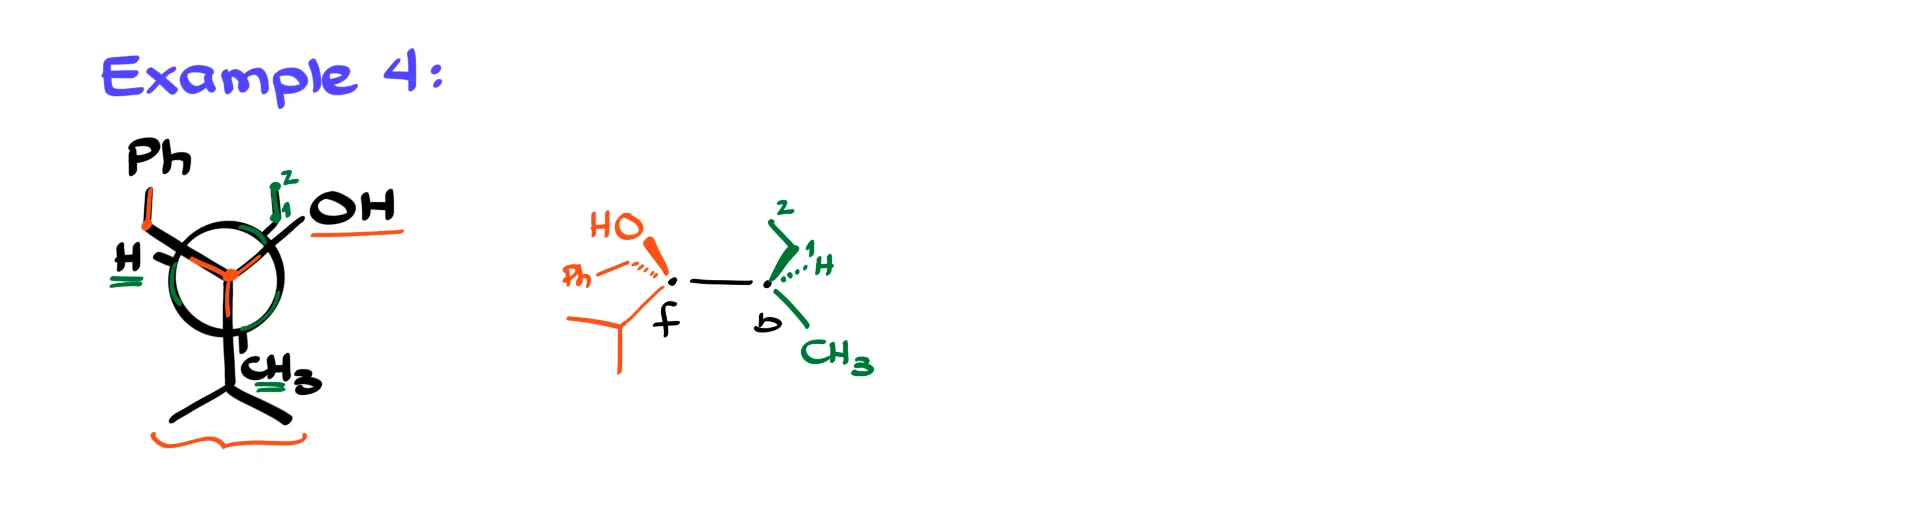
The front isopropyl group points down in the plane of paper. The OH on the right appears above the horizon, so I draw it up on the wedge. The CH2Ph group sits down on the dash. On the back atom the CH3 is down in the plane of paper, the ethyl group lies on the right above the horizon on a wedge, and the hydrogen sits on the left above the horizon on a dash. Once again, the pattern is consistent and predictable.
Example 5
The final example is a cyclic molecule.

You can spot cycles in Newman projections when the front and back atoms are connected by a chain that loops from one to the other. If I use the usual left-to-right approach here, I end up with a very awkward picture. Instead, it is far easier to imagine looking down at the molecule from above. I use the horizon as the plane of paper and place the front atom and back atom vertically aligned. The methyl group on the front atom is above the horizon, so I draw it on a wedge. The isopropyl group sits below the horizon and goes on the dash. On the back atom the hydrogen is above the horizon on the wedge and the OH is below the horizon on the dash.
The one remaining task is connecting the two atoms with the rest of the ring. I label the chain atoms as 1, 2, 3, and 4 between the front and back atoms. Then I simply connect them in sequence. Once the ring is in place, I can redraw the final structure neatly without the helper numbers. If I want, I can add the implicit hydrogen as an explicit one, but it is not necessary.
So this is the full method. Converting a Newman projection into a dash-and-wedge drawing becomes a straightforward mechanical exercise for as long as you follow the same algorithm every time. Visualizing molecules in 3D is still valuable, but during an exam or any high-pressure situation, this strategy gives you a reliable way to get the right structure without guesswork. And now you know how to make the conversion cleanly and consistently.