Newman Projection of Cyclohexanes
Drawing a Newman projection of a cyclohexane can be quite a challenge, so let me show you a couple of strategies for how you can easily do it every single time.
Strategy 1: Via Chair Conformation
The first strategy we’re going to talk about today involves drawing a proper chair. And I mean a proper chair, not one of those bow-tie shapes or squiggly Harry Potter-looking lines that some students like to draw. I mean a proper chair, like the ones you see in your textbook. If you’re not sure how to draw one, I do have a dedicated tutorial on that as well.
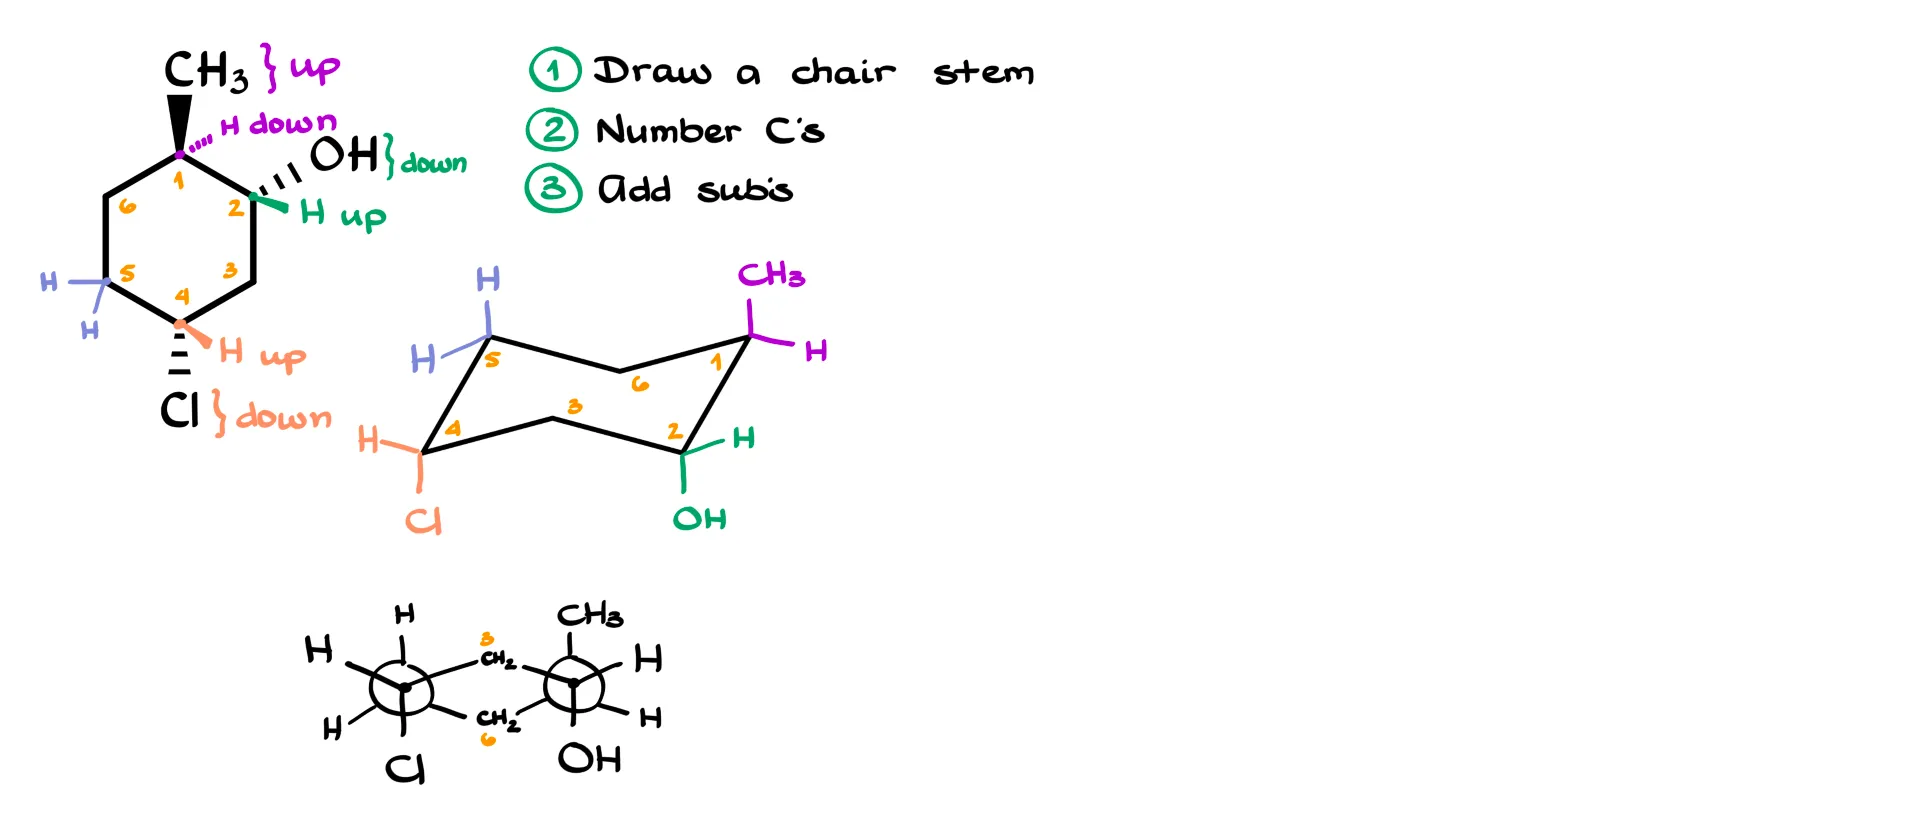
So, let’s say we have the molecule above. Step one is to draw the chair stem, like this. Next, I’m going to number my carbons. As I’ve mentioned in some of my other tutorials on chairs and stereochemistry, it doesn’t really matter exactly how you number your ring, as long as you’re consistent. I personally like to start numbering from the top right corner and go clockwise.
Next, we’re going to add our substituents. On carbon number 1, we have a methyl group and an implicit hydrogen. Since the methyl group is on the wedge, that means it’s in the up position, and the hydrogen is in the down position. So I’ll draw the methyl group, CH3, in the up position, and the hydrogen in the down position.
Similarly, on carbon number 2 we have an OH group. That one is on the dash, so it’s in the down position. We also have an implicit hydrogen, which is on the wedge, putting it in the up position. So for carbon number 2, the hydrogen goes in the up position and the OH group goes in the down position.
Next, we have chlorine on carbon number 4. Chlorine is on the dash, so it’s in the down position, and we have an implicit hydrogen on the wedge, putting it in the up position. So for carbon number 4, the chlorine goes in the down position and the hydrogen goes in the up position.
Finally, we get to carbon number 5, where, conveniently, there’s nothing significant going on. We just have a couple of hydrogens, one in the up position and one in the down position, so I’ll outline those at the angles where they belong.
Now, there’s something really important I want to emphasize here. Whenever you’re drawing your chair, make sure that the two bonds containing the groups you’re interested in are these edge bonds. If your substituents aren’t on those atoms, you might want to renumber your chair and redraw the groups in different positions, and here’s why.
When you have your groups aligned like this, you’ve essentially already drawn ninety percent of your Newman projection. We have a couple of front atoms, this one and this one, which give us this portion of the projection, and the same thing happens on the left side. Then we have a couple of back atoms, and those groups give us the rest. So essentially, the Newman projection is already sitting right there in the chair.
What I mean is that if I take atom number 4, my front atom here, and atom number 2, my front atom on the right side, I can draw them right underneath the chair. So for these two, I have hydrogen here, chlorine there, and atom number 3 in between them. On the right side, I have hydrogen on the right and the OH looking down, with atom number 3 in between again.
For now, to keep things simple, I’ll remove the atom number 3 markings so they don’t clutter the picture. Moving on to the back atoms: atom number 5 on the left has one hydrogen up and one hydrogen down, plus atom number 6 going up and down as well. We see the same thing on the right side with atom number 2: the methyl group looking up, a hydrogen at the bottom right, and then atom number 6 going down again.
And there you have it, your Newman projection is constructed. We have a CH2 here, which was carbon number 3, and another CH2 down there, which was carbon number 6. The only thing left to do is bring the right side of the picture a little closer to the left side, and you’ve got a Newman projection for your six-membered ring. Pretty easy.
And of course, you can do exactly the same thing for the other conformation if you do a chair flip. As you can see, that was fairly simple.
The only catch with this approach is that you need to be able to draw a proper chair, and that part is non-negotiable. Drawing a chair well takes a lot of practice, and especially early in a course, some students aren’t yet as comfortable with it as they’d like to be. So what do we do in that case? Luckily, there’s a second technique I can show you that doesn’t require a chair at all.
Strategy 2: Direct to Newman
For this method, the first thing I’ll do is number my atoms right away. I’ll start with the top carbon as number 1, then go clockwise. As I mentioned before, it doesn’t matter how you number your atoms as long as you’re consistent. These numbers are just anchor points, they have nothing to do with IUPAC rules or anything like that.

To draw a Newman projection for this molecule, we need to decide which two bonds we’re going to look at. We want to make sure those bonds contain our groups of interest, so in this case, that’s the bond between atoms 1 and 2, and the bond between atoms 4 and 5.
Here’s where a really important part of this method comes in: you have to decide which pair of atoms will be your front atoms and which pair will be your back atoms. Let’s say the right side of the molecule, as drawn, is going to be the front, which means atoms 2 and 4 are our front atoms, while atoms 1 and 5 are our back atoms.
Now, to draw the Newman projection, I’ll start by drawing the stem for the six-membered ring. Make sure you draw it so the front and back lines are touching each other, like this, and there’s your stem for a Newman projection over a six-membered ring.
I’ve decided that my front atoms are atom number 2 and atom number 4, so I’ll label this one as atom 2 and this one as atom 4. From here, I’ll go straight to placing the groups onto the projection. On atom number 2, we have an isopropyl group on the dash, so that’s the down position. Looking at atom number 2 on the Newman projection, this is the down position, so I’ll draw the isopropyl group here. The other group on atom number 2 is an implicit hydrogen on the wedge, which is the up position, so the hydrogen goes here on the front atom.
Now, here’s a really important part: don’t flip-flop your atoms or accidentally mismatch them. Be extremely careful about where each atom is, so you don’t put a group on the wrong one. Keep a close eye on that.
Now for atom number 4: there’s a methoxy group in the down position, so I’ll put OCH3 on atom number 4 here, and there’s also an implicit hydrogen on the wedge, putting it in the up position, so the hydrogen goes here.
Just to be clear, whenever I refer to the up and down position in a Newman projection, I’m using this horizon line. Everything above the horizon is an up position, and everything below it is a down position.
Alright, now let’s move to the back atoms. On the right side, atom number 1 has an OH on the wedge, putting it in the up position, so I’ll draw it here, along with an implicit hydrogen on the dash, putting it in the down position. For atom number 5, there’s a bromine on the dash, which is the down position, and an implicit hydrogen on the wedge, which is the up position. And there we have it, our complete Newman projection.
Let’s do one more example.

Here’s another molecule, and again I’ll just assign numbers to the atoms. This time, I want to construct my Newman projection around atoms 6 and 1, and atoms 4 and 3, because that’s where our groups are, and those two bonds are parallel to each other, which is exactly what we need.
Like before, I’ll draw the stem for the Newman projection, then decide which side of the molecule is the front and which side is the back. Let’s say the left side is the front, so atoms 6 and 4 are our front atoms, and the right side is the back, so atoms 1 and 3 are our back atoms.
Atom number 6 goes on the left and atom number 4 goes on the right. Starting with atom number 4, there’s a bromine on the wedge, which is the up position, so I’ll draw the bromine here. There’s also an implicit hydrogen on the dash, putting it in the down position.
Now for atom number 6, there’s a chlorine in the up position, so I’ll draw that here, and an isopropyl group in the down position on the dash, drawn just like that.
Moving to the back atoms: on atom number 1, there’s an OH in the up position, and an implicit hydrogen on the dash in the down position. On carbon number 3, there’s nothing to decide, just a couple of hydrogens, one up and one down. And there you go, you have your six-membered ring drawn as a Newman projection.
So as you can see, drawing a Newman projection of a six-membered ring might sound difficult, but in reality, it’s not that big a deal at all.